Button's popping off…
How can something so small cause such a major inconvenience?
Especially on your made-to-measure suits & shirts?
You paid good money…
And now have to find something else to wear because of an annoying button.
Going to the tailor just to get a button fixed?
Who has time for that?
Well – you don't have to.
Sewing is a good skill to know…
No – it's not feminine.
You think Rambo stitching up his wounds is feminine?
Nope – and you can learn too.
You just need a needle, some thread…
and a little know-how…
to refasten the button and be on your way.
No need for a tailor…or grandma's sewing machine.
Here's how to sew on a button by hand.
How To Sew On A Button: Before You Start
If your button goes missing – you first want to check if your shirt or garment has an extra button or two that's sewn in on the bottom of the inside. If not, you're hunting for a match. Craft stores like Michaels and Hobby Lobby still stock button cards, and there's no shortage of them online. But the best source is a dress shirt you've already retired – cut the buttons off before it goes in the donate pile and you'll never pay for a match again.
Then you must choose the color of thread to use. Try to match the color with what the remaining buttons on your clothing use.
Color's the easy part. The thread itself matters more than most guys think. All-purpose polyester – the stuff in a hotel sewing kit – is fine on a dress shirt. On a sport coat, an overcoat, or a pair of chinos it's too thin. It'll hold for a month and then let go in a parking garage.
For anything heavier than a shirt, use button thread – also sold as topstitching or heavy-duty thread. It's thicker, and it's built to take a button getting yanked twenty times a day. Gütermann's Topstitch is easy to find and one spool will outlive the coat. If all you've got is regular thread, double it up and run a few extra passes. Not as good, but it'll hold.

Here's a list of everything you'll need to repair a loose button:
- A similar or matching button (if not the original)
- Thread that has a length of 24 inches (of the same color)
- Two needles
- A pair of scissors
- A hand seamer
Use your hand seamer to carefully remove the loose button (unless the button has already come off).
Emphasis on carefully – since you don't want to poke a hole in the fabric!
Next, take one of your needles. Feed one end of your 24-inch thread through the eye of the needle.
This will be followed by pinching both ends of the thread together – pulling the needle towards the center. Make sure both ends are equal in length.
Wrap the thread around your index finger and form an X-shape. Pinch the X in between your thumb and index finger.
Then slide your index finger back – letting the thread roll forward. Bring your middle finger down in the front, pulling the thread with your other hand.
You'll be left with a solid knot for your new button thread which won't come undone – and is large enough to avoid slipping through the fabric.
Now it's time to start sewing…
How To Sew On A Button: Step #1
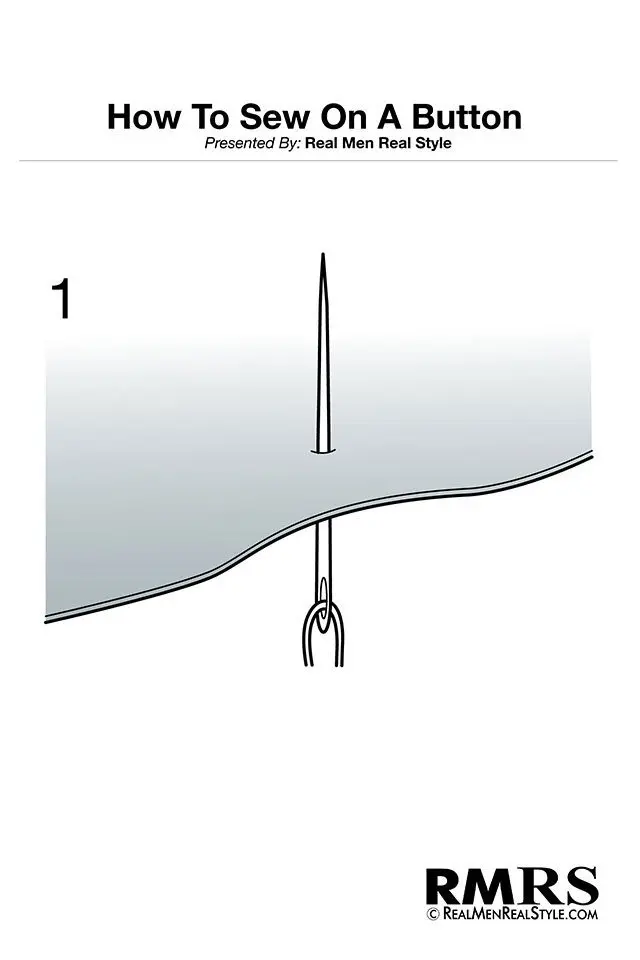
Starting on the back side, pass the needle through your fabric and bring it to the front. You should be carefully following 4 designated holes that match the holes on your button.
Step #2

Continue passing the needle through the front and diagonally to the back, and then diagonally back to the front – until you form an X-shape on the fabric.
Step #3
Pull the thread all the way taut from the back. You should now have a clean X stitched into the fabric, sitting exactly where the button used to be.

Step #4
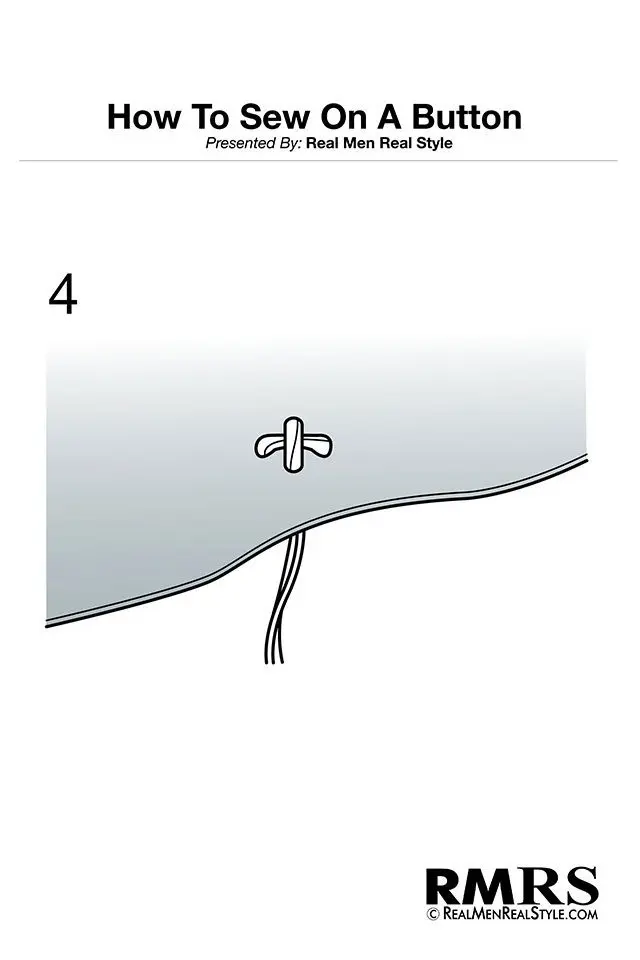
This newly formed X-shape becomes the precise mark for where you're going to sew the button.
Now place the button on top of the X-mark. Then take the second needle and place it on top of the button.
This is a crucial part of forming the shank (part of the thread that's looped around under the button to make it secure and easier to fasten).
Step #5
Pass the thread through the back once again, going through the first of the 4 holes on the button itself – passing over the second needle. The string should head diagonally toward the second hole.

Step #6
Push the first needle all the way through each of the holes on your button. Pull the thread taut every time. Follow the exact same pattern you used in forming the previous X-mark.

Step #7
You'll need to go through all the 4 holes (both front-to-back and back-to-front) approximately 6 times.
For the first couple of passes, you'll have to hold the button and the second needle with your fingers. But eventually, both of them should be held tightly in place by the thread.

Step #8
Keep going until the button feels locked down and won't shift when you push on it. The second needle should now be trapped under the thread – that little gap it's holding open is what becomes your shank.

Step #9
Once you're done making all of the passes, pull the first needle all the way through the back. You can now remove the second needle – because it's time to create the shank.
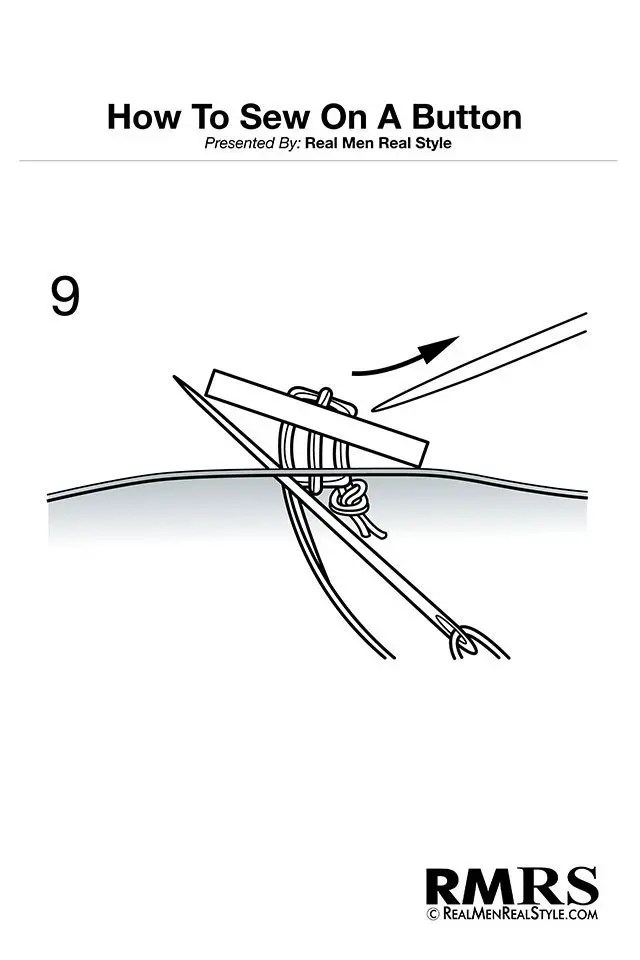
Wrap the remaining string tightly around the threaded area underneath the button. You should give it around 5-6 full loops in total.
Step #10
Pull each loop snug as you go. Those wraps are what turn a pile of loose thread into a solid stem, and a tight stem is the difference between a button that lasts a year and one that lasts a decade.

Step #11
With the shank wrapped, push the needle back down through the fabric to the inside of the garment.

Step #12
Pull it all the way through so the wrapped shank stays tight and doesn't unwind on you.

Step #13
It's time to finish the whole thing up with a few knots. Pull the needle through to the underside of your clothing once more.

Step #14
Take a small stitch through the fabric on the back side, but don't pull the thread all the way through – leave a loop. That loop is what you'll knot against.

Step #15
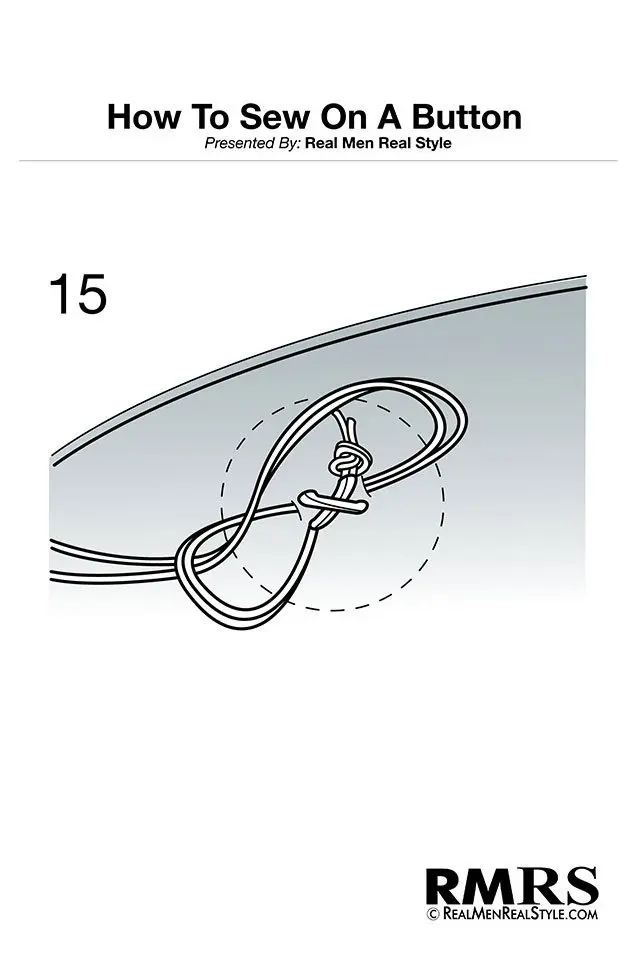
Create a good knot by passing the needle through the loop that was just formed at the back. Pull the string tightly.
Step #16
Double-knot the thread to keep it extra secure.

Step #17
Once you've done these final knots, use your scissors to cut off any excess thread.

Step #18
Congratulations! You've just finished sewing on a button – and your clothing piece should be now looking good as new.

Click HERE to view the FULL Infographic – How To Sew On A Button
Tips & Reminders:
- Ensure that every single time, you're pulling the thread nicely and tightly through. Loosely done threads tend to look sloppy in the end – forcing you to restart the whole process.
. - While traveling, if you spot a loose button on your shirt – ask the front desk for a sewing kit. Most hotels stopped leaving them in the room years ago, but they'll still hand you one free if you ask. It won't have a hand seamer, but a needle, thread and a spare button is enough to get you to the meeting.
. - You don't necessarily have to follow the cross (X-shaped) style of threading. There are actually 3 other techniques you can use:

The 4 Ways To Stitch A 4-Hole Button
All four patterns in that graphic will hold a button on. The difference is how much strain they take and what they say about the garment.
The cross is what you just learned, and it's what nearly every factory uses. It's the strongest of the four, because the two stitches pull against each other instead of in the same direction. Use it on anything you actually depend on.
The parallel – two straight bars sitting side by side – is the classic dress shirt look. A hair less secure than the cross, but cleaner. You'll see it on better shirting where the maker wanted the buttons to look deliberate.
The square runs thread around all four holes in a box. It uses more thread than the job needs and it's the weakest of the four. Treat it as decoration, not construction.
The crow's foot – three stitches meeting at a point, like a bird's track in mud – is the tell of hand-finished Italian shirtmaking. It takes longer and adds nothing structurally. It's there so you know a person sewed it and not a machine.
Pick one and use it across the whole garment. Four buttons stitched four different ways looks like exactly what it is.
2-Hole, 4-Hole & Shank Buttons: What Actually Changes
Everything above assumes a 4-hole button, because that's what's on most shirts. Two other kinds show up in a man's wardrobe, and each one changes the job slightly.
A 2-hole button is the same process with half the geometry – a straight bar, back and forth, six to eight passes. You still build the shank. Skipping it is the most common mistake guys make.
A shank button already has its own stem: a small loop or post cast into the back, with no holes through the face. You'll find these on blazers, overcoats, and anything with a metal or horn button. Because the shank is built in, you don't need the second needle and you don't wrap a thread stem. Stitch through that loop six to eight times and knot off. Keep the stitches stacked in one spot so the button can pivot – spread them out and it'll sit crooked for the life of the coat.
How To Sew A Button On A Suit Jacket Or Overcoat

Same technique, three adjustments. Get these wrong and the button on your overcoat will keep coming off no matter how many times you sew it back on.
Make the shank longer. On a dress shirt the fabric is a millimeter thick and the button sits close. On an overcoat you've got a quarter inch of wool plus a lining, and the button has to clear all of it before it can seat in the hole. So instead of laying a needle under the button, lay a matchstick or a toothpick. That gives you the height you need.
Use button thread. A coat button carries real weight and gets yanked with a gloved hand in the cold. Thin all-purpose thread is not up to it.
Check for the reinforcing button. This is the one nobody tells you about. Better coats have a small flat button on the inside of the cloth, sitting directly behind the front button, and your stitches are supposed to pass through both. It spreads the load across the wool instead of concentrating it on four little holes – which is exactly why the button tore out in the first place. If your coat doesn't have one, sew a small flat button on the inside as you go. Nobody sees it and the front button never leaves again.
One exception. If the button ripped a hole in the wool on its way out, stop. That's a tailor job – a patch from the inside, and it's cheap. Sewing a new button onto torn cloth just tears it wider.
Why Your Buttons Keep Falling Off

A button almost never fails on its own. The thread fails, and it fails for one of four reasons.
No shank. The button was sewn flat against the fabric, so every time you fasten it the thread gets ground between the button and the cloth. It saws itself apart. This is the big one.
Too few passes. Factory machines make about four. Four is enough for the shirt to survive the store. It is not enough for two years of wear. Six to eight, every time.
A knot that isn't really a knot. One loop pulled tight will slip. Double it, and take one small stitch through the fabric before you knot so the whole thing is anchored to cloth and not just to itself.
Long thread tails. Cut them to about an eighth of an inch. Leave half an inch hanging and it catches on everything, works the knot loose, and you're back here in a month.
Here's the move that saves you all of it. When you buy a new dress shirt, go around and check every button before you wear it. Anything that wiggles gets thirty seconds and six passes right then, instead of turning into an emergency in a hotel room the morning of a meeting. Same principle as knowing your tailor – you handle it before it becomes a problem.
How To Sew On A Button: Common Questions
How many times should you go through a button?
Six to eight passes through all the holes. Factories do about four, and that's why factory buttons come off. If you're working with thin all-purpose thread, go eight. With heavy button thread you can stop at five.
What kind of thread do you use to sew a button?
All-purpose polyester for shirts. Button thread – sometimes labeled topstitching or heavy-duty – for jackets, coats and trousers. Match the color to the thread on the other buttons, not to the fabric. Those are usually two different colors, and the thread is the one people see.
Do you really need a shank on a shirt button?
Yes. Even on thin shirting the button needs slack so it can sit on top of the buttonhole instead of straining against it. Sew it flat and the thread grinds itself apart every time you fasten the shirt. A sewing needle laid across the button gives you exactly the right amount.
How long does it take to sew on a button?
About five minutes your first time, under two once you've done a handful. Faster than driving to the tailor, and free.
Sewing on a button takes five minutes and a needle. That's the whole investment – and it means a shirt you paid real money for never sits in the closet unwearable because of a disc of plastic the size of a dime.
Learn this one, then learn to fix a dropped hem. Between the two you handle most of what goes wrong with your clothes without ever leaving the house.
Now go check your shirts.