A fancy dinner is coming up…
No business, purely social…
Great! A time to relax…
Then again… you know how everybody's going to look…
dressed to impress…
trying to outdo the rest…
and the most praised guy has all the fun.
You don't want to be left behind!
So how do you step ahead?
The trick is simple… spice up your tie…
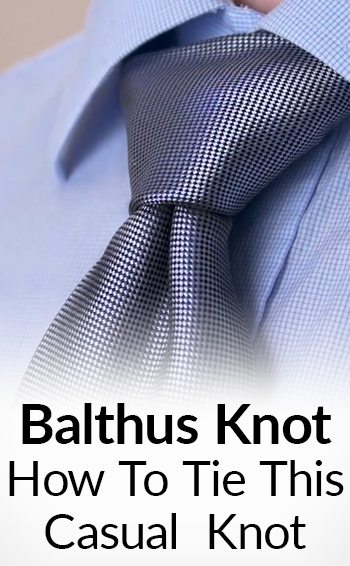
using the Balthus Knot.
No gimmicks… no trying too hard…
Just a UNIQUE knot that helps you get a KILLER outfit.
Discover how to tie this casual knot…
I have had my fair share of “posh” occasions. So I know what it's like to attend one and feel the need to look more interesting. You want just a small bit about yourself – particularly your style – which seems extraordinary…
That's exactly what the Balthus offers. This unorthodox, symmetrical necktie knot was named after a Polish-French painter. It is said he invented it out of boredom, yet he never bothered to wear it regularly. And that makes sense – it's a special kind of knot you only wear once in a while.

Some call it “The Cousin of the Full Windsor,” but the process takes a lot more time (and patience). There are a total of 9 moves or “passes” to complete, as well as 4 loops around the central body of the knot. The tie used for it should be a very long one that widens quickly. That's the key to how striking it looks at the end.
Men who want the maximum Balthus effect should learn how to position the knot so that the tie underneath is already near its full width. The result – your necktie becomes the centerpiece of your outfit. It strikes a perfect balance between its larger size and the sleek-looking knot.
However, let me remind you that the Balthus has certain limitations. The additional width doesn't make it a flattering choice for narrow faces or torsos. It's also too showy and extravagant for business settings.
Wait for your invitation to those fine dining dinners, theater and art events, or well-to-do salons. Those are the advantageous times to wear it.
Here's a brief summary of the Balthus Knot and its use:
- Level of difficulty: Medium
- Formality: Classy social settings
- Recommended collars: Spread collars, cutaway collars
- Most compatible with: Wide faces & torsos
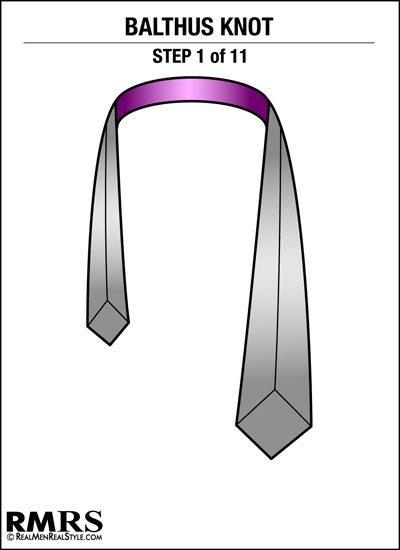
How To Tie A Tie: The Balthus Knot – Step #1
Flip up your shirt collar and drape the tie around your neck with its backside exposed. The thick end should be hanging on your left-hand side – at least to the mid-thigh area. Meanwhile, the thin end should reach to about the center of your chest.
–
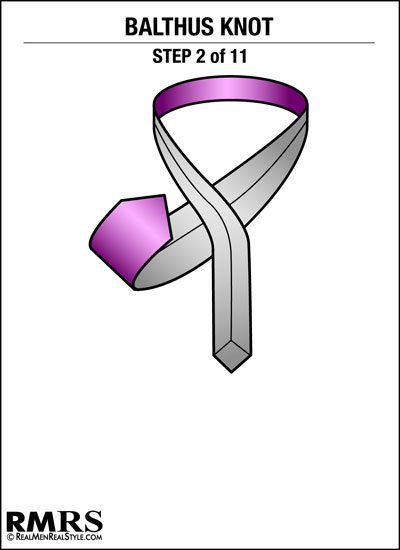
How To Tie A Tie: The Balthus Knot – Step #2
Cross the thin end over the thick end. The thin end should now be hanging on your left, and the thick end on your right. Use one hand to firmly grasp the intersection point between both ends.
–
How To Tie A Tie: The Balthus Knot – Step #3
Use the other hand to bring the thick end over to the front, pointing its tip toward the ceiling. You're just about ready to pull it down through the loop.

–
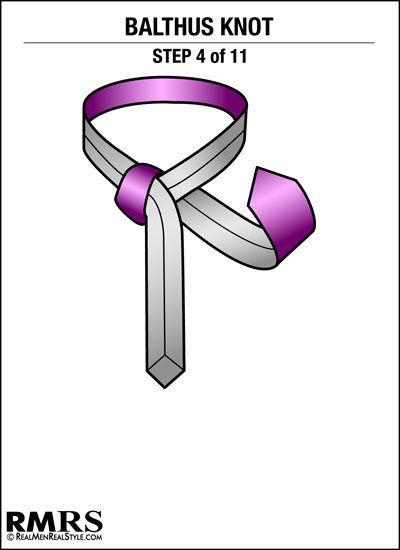
How To Tie A Tie: The Balthus Knot – Step #4
Pull the thick end straight down, crossing behind the thin end. The thick end should now be hanging on your left once again. The backsides of both ends remain exposed.
–
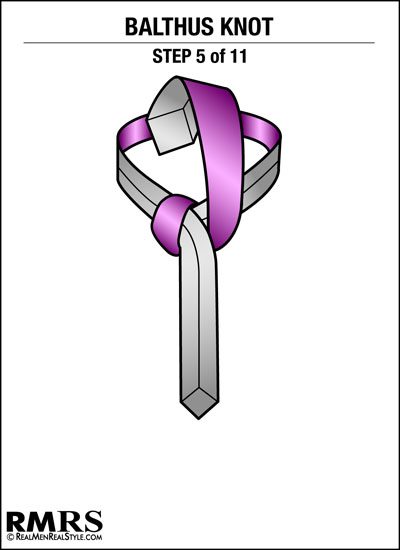
How To Tie A Tie: The Balthus Knot – Step #5
Bring the thick end back up in front, pointed toward the ceiling. Then loop it over the thin end.
–
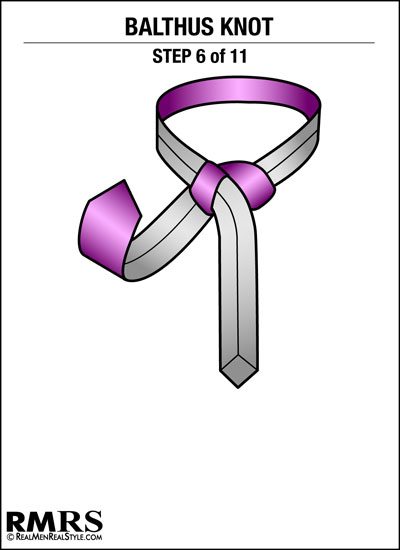
How To Tie A Tie: The Balthus Knot – Step #6
Pull the thick end down, this time going to the right-hand side of the forming knot. As of now, the thick end is tucked behind the thin end and hanging on your right. Both backsides are still exposed.
–
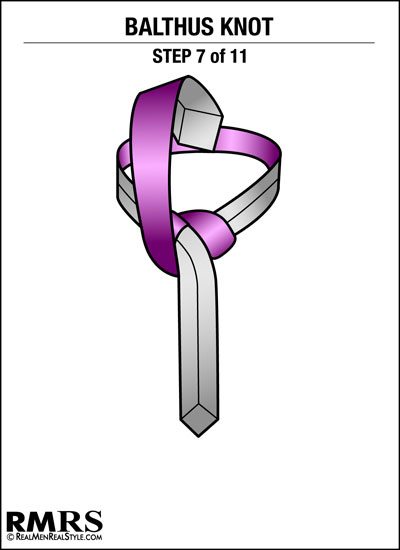
How To Tie A Tie: The Balthus Knot – Step #7
Once more, point the tip of the thick end toward the ceiling. Then loop it over the center of the knot.
–
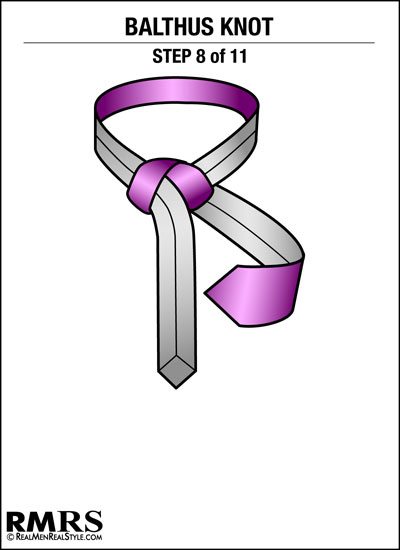
How To Tie A Tie: The Balthus Knot – Step #8
Bring the thick end down and behind the knot, crossing from right to left.
You should finish exactly where you were at the end of Step #4 – with the thick end behind the knot, hanging on your left. The backsides remain seen (the seams are still facing outward).
–
How To Tie A Tie: The Balthus Knot – Step #9
This is the part where the pattern changes.
Bring the thick end horizontally across the front of the knot, going from left to right. The tip should be pointed straight to the right – with the front side now exposed. Meanwhile, the thin end should still be hanging down with its backside exposed.
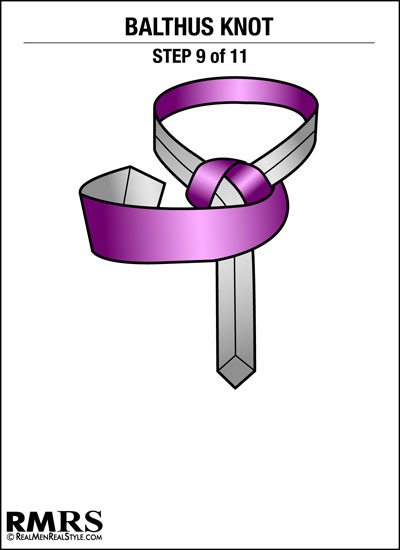
–
How To Tie A Tie: The Balthus Knot – Step #10
Bring the thick end through the loop and behind the knot, with the tip pointed straight up. Make sure you leave a little looseness in the horizontal pass that was just made. Be ready to bring the thick end down, passing through this little horizontal loop.
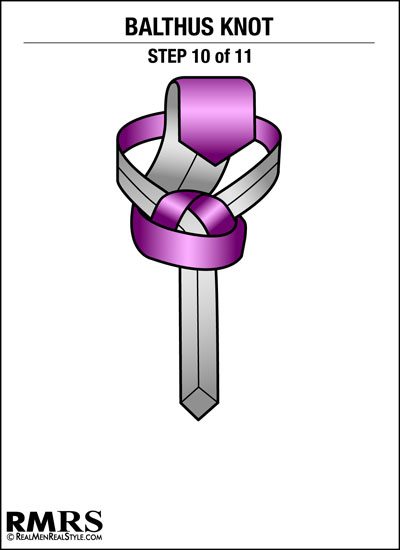
–
How To Tie A Tie: The Balthus Knot – Step #11
Pull the thick end all the way down, tucking it through the horizontal loop. At this point, the thick end should lie directly over the thin end, with its front side exposed. The thin end shouldn't be seen at all.
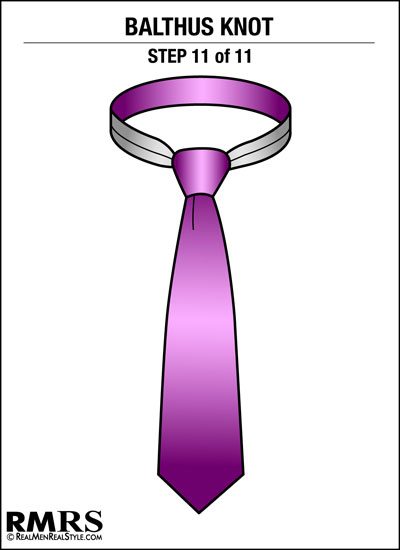
–
The Balthus Knot – Final Check
Now you just need to remember these guidelines:
- Adjust the knot further by tugging down gently on the thin end with one hand, while snugging the knot in place with the other hand.
- This knot style relies on width/thickness. You will know that you pulled it off if the tie creates an almost scarf-like look below the neck. If it's on the skinny side, you'll want to redo the process or use a different tie (otherwise you'll risk looking awkward).
- Ideally, the tip of the tie should touch your belt line – as with all modern tie knots.
Click here to view a FULL infographic on How To Tie The Balthus Knot
Congratulations! You have a finished Balthus Knot tie to proudly show off. It’s a guaranteed attention-getter – so make sure you're wearing it with a smile, fully confident and ready to mingle!
Click here to check out my guide on 17 other tie knots you can use to look extra-stylish.
Click here to watch the video – How To Tie The Balthus Knot
Click here to watch the video on YouTube – How To Tie This Casual Tie Knot

")


")