The Balthus Knot.
An absolute monster of a tie knot.
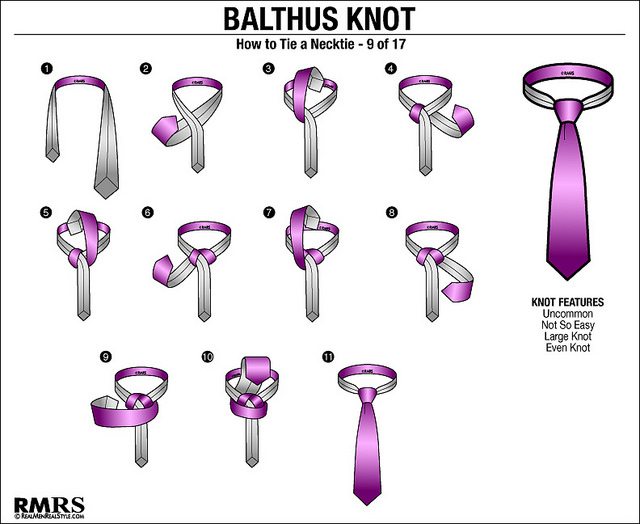
It takes nine moves or “passes” to complete, and has four “centers” (loops around the central body of the knot).
Are you ready to take a step up from the Full Windsor?

This knot is a great choice if you want to stand out and send a strong message. Because of the many folds in this knot, you will need a tie that is at least 57 inches long, but preferably 59 inches.
Summary of the Balthus Knot:
- Size: Large
- Symmetry: Yes
- Difficulty: Medium
- Formality: Fine social dress; too extravagant for business dress
- Recommended Collars: Spread collars, cutaway collars
Men who want the full Balthus effect should position their knot so that the tie beneath it is already near its full width. Needless to say, this is striking — and requires a very long tie that widens quickly.
#1. Balthus Knot – History
The Balthus was named for its inventor, an eccentric Polish-French painter. He claimed to have developed it out of boredom, but did not wear the knot with any regularity.
Sometimes known as “The Cousin of the Full Windsor,” it requires a very long tie. In addition, the creator’s intent was for the tie immediately below the knot to be quite wide, more than most men wear their ties.
#2. Balthus Knot – Description
This unorthodox, symmetrical necktie knot was named after a Polish-French painter. It is said he invented it out of boredom, yet he never bothered to wear it regularly. And that makes sense – it’s a special kind of knot you only wear once in a while.
Some call it “The Cousin of the Full Windsor,” but the process takes a lot more time (and patience). There are a total of 9 moves or “passes” to complete, as well as 4 loops around the central body of the knot. The tie used for it should be a very long one that widens quickly. That’s the key to how striking it looks at the end.
Men who want the maximum Balthus effect should learn how to position the knot so that the tie underneath is already near its full width. The result – your necktie becomes the centerpiece of your outfit. It strikes a perfect balance between its larger size and the sleek-looking knot.
However, let me remind you that the Balthus has certain limitations. The additional width doesn’t make it a flattering choice for narrow faces or torsos. It’s also too showy and extravagant for business settings.
Wait for your invitation to those fine dining dinners, theater and art events, or well-to-do salons. Those are the advantageous times to wear it.
#3. Balthus Knot – Step By Step
- Drape a LONG tie around your neck with the seam upward and the thick end on your left. The thick end should hang at least to mid-thigh and the thin end to the center of the chest.
- Cross the thin end over the thick.
- Bring the thick end up in front, tuck it down behind the thin end and cross behind it.
- Bring the thick end back up in front and loop over the thin end, this time on the left side of the forming knot.
- Tuck the thick end down and across, finishing with it behind the thin end and to its right.
- Flip the thick end upward and loop it over the center of the knot.
- Now bring the thick end down behind the knot, crossing from right to left.
- Bring the thick end horizontally across the front of the knot, crossing from left to right.
- Bring the thick end behind the knot and upward. Leave a little looseness in the horizontal pass you just made.
- Tuck the thick end through this horizontal pass.
- Adjust by tugging gently down on the thin end while snugging the knot in place with your other hand. Ideally, the tie beneath the knot should be quite wide but still fall to your beltline.
Want this infographic without all the text? I've got you covered. Click here to view it in its own dedicated article!
Now you just need to remember these guidelines:
- Adjust the knot further by tugging down gently on the thin end with one hand, while snugging the knot in place with the other hand.
- This knot style relies on width/thickness. You will know that you pulled it off if the tie creates an almost scarf-like look below the neck. If it’s on the skinny side, you’ll want to redo the process or use a different tie (otherwise you’ll risk looking awkward).
- Ideally, the tip of the tie should touch your belt line – as with all modern tie knots.
Fantastic, you've now mastered this complicated knot! The Balthus Knot is Knot 10 in our 18 part how to tie a tie series. Check out or article on how to tie a tie 18 ways for more knots, infographics and video tutorials.

Click here to watch the video on YouTube – How To Tie This Casual Tie Knot